

Forget baby hand prints... check out Poof's piggy paw prints!
As promised, here's our craft tutorial for making guinea pig paw print keepsakes. Instead of using a pre-made pet kit, this easy DIY project makes use of ingredients you most likely already have in your pantry.
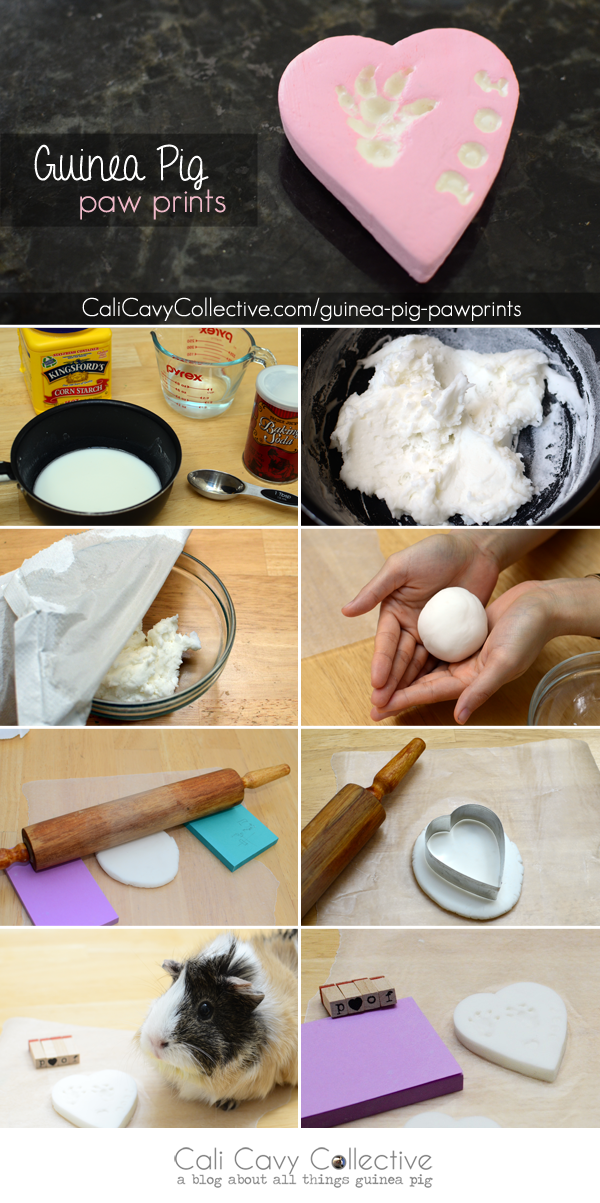
MATERIALS
- 4 tbsp cornstarch
- 8 tbsp baking soda
- 6 tbsp water
- Wax paper
- Rolling pin
- Cookie cutter
- Mod Podge
INSTRUCTIONS
- Combine the cornstarch, baking soda, and water in a small pot.
- Stir over low heat until the mixture starts to come together. Remove from the stove when it starts to take on the consistency of mashed potatoes.
- Pour the mix into a bowl. Cover with a damp cloth or paper towel and let cool for 10-15 minutes.
- Remove the cloth and briefly knead the "dough" until smooth. If the dough feels dry or crusty, dampen the mix with water and knead.
- Place a sheet of wax paper on your work surface. Roll out the dough until it is about 1 cm thick.
Tip: use Post-it pads as guides for the rolling pin to ensure a flat, even surface. - Cut out the desired shape using a cookie cutter.
- Gently press your guinea pig's paw into the clay to make an imprint. Make sure not to press all the way through.
Optional: if you're using stamps, add them here. - Set aside until the keepsake is completely dry. The dough has a tendency to crack while drying so try not to disturb it. It make take a few tries before you get it right.
- Apply Mod Podge to seal the keepsake.
Once you've made your custom paw prints, get creative! Here are some ideas.
PERSONALIZE YOUR PAW PRINT
- Spell out your cavy's name with stamps
- Brighten it up with acrylic paint
- Add a touch of sparkle with glitter, sequins, or rhinestones
- Decorate it with a bow
- Add ribbon to turn it into a Christmas ornament
I stamped each pig's name into the corresponding paw print, highlighted the imprints with acrylic paint, and finished them with a few layers of matte top coat spray paint. It's interesting to compare the prints taken from each pig - no two impressions are alike!
So, are you interested in making a few? How do you plan to personalize your keepsakes?
It can take from half a week to a full week to completely dry. After that they're pretty darn solid. I actually take a butter knife to it to smooth out some of the rough edges.
ReplyDeleteSeriously cute! I may have to try these.
ReplyDeleteHow long until they dry? And I'm guessing they're not as fragile once they've completely dried?
So cute! I need to make some for Jaina-pig!
ReplyDeleteSo cute! Thanks for the fantastic tutorial!
ReplyDeleteIt's an all in one sealer/glue/finish that you can apply to a variety of mediums. You can find it at any art and craft supply store.
ReplyDeleteYes, I covered them with a layer of Mod Podge, waited for Mod Podge to dry, painted them with acrylic paint, then applied matte top coat spray paint after it was dry.
ReplyDeleteWhat is mod podge?
ReplyDeleteWhen painting different colors......Did you modge podge, then paint, then seal? -- Super Cute idea -- Thanks
ReplyDeleteThese are awesome! Do you mind if I do a video making these for my youtube channel? I would totally credit you!(I don't have many subs+views so only a couple people will see it anyways)
ReplyDeleteSure and thanks for asking! I'd certainly appreciate it if you included a link back to the tutorial article on here :)
ReplyDeleteLooking forward to seeing it!
I sure will! And Thanks :)
ReplyDeleteThis is so cute. I'll definitely will be trying on my guinea pigs. They are going to freak out.
ReplyDeletewhy does it take so long to dry
ReplyDeleteAir drying can take a while. Drying them in an oven is faster but makes them prone to cracking.
ReplyDeletehow do u know when there officially done
ReplyDeleteMy little Molly was just diagnosed with lymphoma a few days ago (pretty advanced stage so we don't have much time left with her) and I'd like to try this with her to have a little keepsake. I just have a couple questions - a) do you need to wait for it to dry completely before painting? and b) did you cover the paw print or anything to keep it or were you just really careful going around the edges of the print and lettering? Thanks for sharing!
ReplyDeleteI'm so sorry to hear about Molly. Sending hugs..
ReplyDeleteYes, you do need to wait for it to dry completely prior to sealing it with Mod Podge. After the Mod Podge has dried, then you can paint away. I didn't cover the paw print while painting it - I just took extra time doing so.
Hope it turns out well!
I needed a dough soft enough to take my cat's imprint and this turned out better than I'd hoped. Thank you for sharing this project :)
ReplyDeleteLooks amazing! Thanks for sharing your pic - I love the lettering. Glad it turned out well for you and your cat :)
ReplyDelete